
Secrets of MicroPython: ESP32 Web Server using Microdot
One of the coolest upgrades to make to any hardware project is to connect it to the (world wide) web. It opens up immense possibilities, like a Cambrian explosion of project ideas that weren't possible before.

This tutorial assumes you know how to work with Micropython tools like Thonny IDE and WebREPL. If you need a refresher on those, have a look at my previous tutorial where I explain it all :)
One of the coolest upgrades to make to any hardware project is to connect it to the (world wide) web. It opens up immense possibilities, like a Cambrian explosion of project ideas that weren't possible before. You could change your home lights based on the time of day, or send yourself a tweet when your fire alarm goes off, or play a 'quack' sound every time NASA's Curiosity rover takes a photo on Mars. It can be as useful or useless as you want!

Luckily for us MicroPython lovers, there is an awesome async web server library called Microdot that lets us do all of that. We're gonna learn how to use it today to control our awesome Neopixel IKEA lamp from a smartphone, but the lessons learned here will allow you to build any internet-connected project using MicroPython. Let's dive in!
Code starter files
If you don't have the code files from the previous tutorial, no worries! I've made the starter files for today's tutorial available for you here and here. Save them as main.py and boot.py respectively. Also, if at any point you get stuck and need to refer to the final code, it's here - no peeking or skipping ahead allowed, though!
Video tutorial
If you'd like to watch a video instead of reading, here it is. Otherwise jump down and keep reading ?
Setup
Installing Microdot
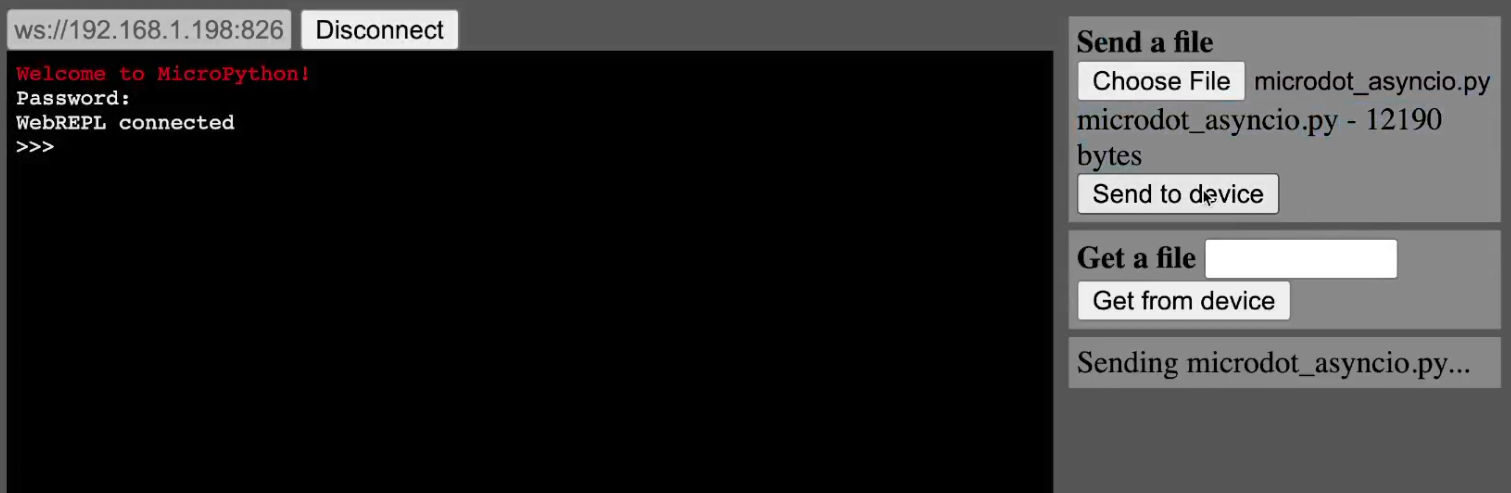
First off, we need to grab the two source files for the Microdot library from here and send them to our ESP32 using WebREPL. Connect to your ESP32's IP address using WebREPL, then use the "Send a File" menu in the top-right corner to select each of microdot.py and microdot_asyncio.py send them over.
Now we need to hop into our code in main.py and import the new library. In addition to importing Microdot, we'll also be importing the library uasyncio. Why is that, you ask? It's because we'll need to make our existing code (in this case, LED animations) asynchronous as well so it can play nicely with the Microdot web server. This kind of programming, where you create multiple functions that run simultaneously and hand-off control between each other, is known as 'co-operative multitasking'. It gives me a warm and fuzzy feeling in my heart knowing that my functions are co-operating with each other. Awww.
import uasyncio
from microdot_asyncio import Microdot
Code
Creating a basic server
Let's jump down to the bottom of main.py and start writing our webserver code. If you've ever used the python web framework Flask before, this will look very familiar. To start off simple and test our setup, let's instantiate the Microdot application and write a route that returns "Hello world".
# setup webserver
app = Microdot()

@app.route('/')
async def hello(request):
	return 'Hello world'
The route '/' refers to the main page, or "homepage", if you will, of the application. In other words, if you navigate to http://<esp32's ip address>/ you will see "Hello world" in the browser window. Also, this is our first asynchronous function! The async keyword modifies the function so that it can be run asynchronously as a task by Microdot. We're not done yet, though. We need to actually run the webserver. At the end of main.py add the following function that start the server.
def start_server():
    print('Starting microdot app')
    try:
        app.run(port=80)
    except:
        app.shutdown()
We use port 80 because that's the official HTTP port number. Which means you can navigate to it by just entering your ESP32's IP address in the browser, without having to specify a separate port number. We also add in an except clause so that if we send Ctrl+C, we can gracefully shut down the server and do some prototyping in the REPL if we need to.
In just a few lines of code, we have written a basic server which is truly amazing. Let's try it out! Use WebREPL to send over your new main.py to the microcontroller (and send boot.py as well if you haven't already) and restart the ESP32 using Ctrl+D. Connect to it again and run the server from the WebREPL console.
import main
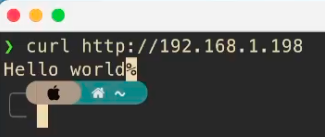
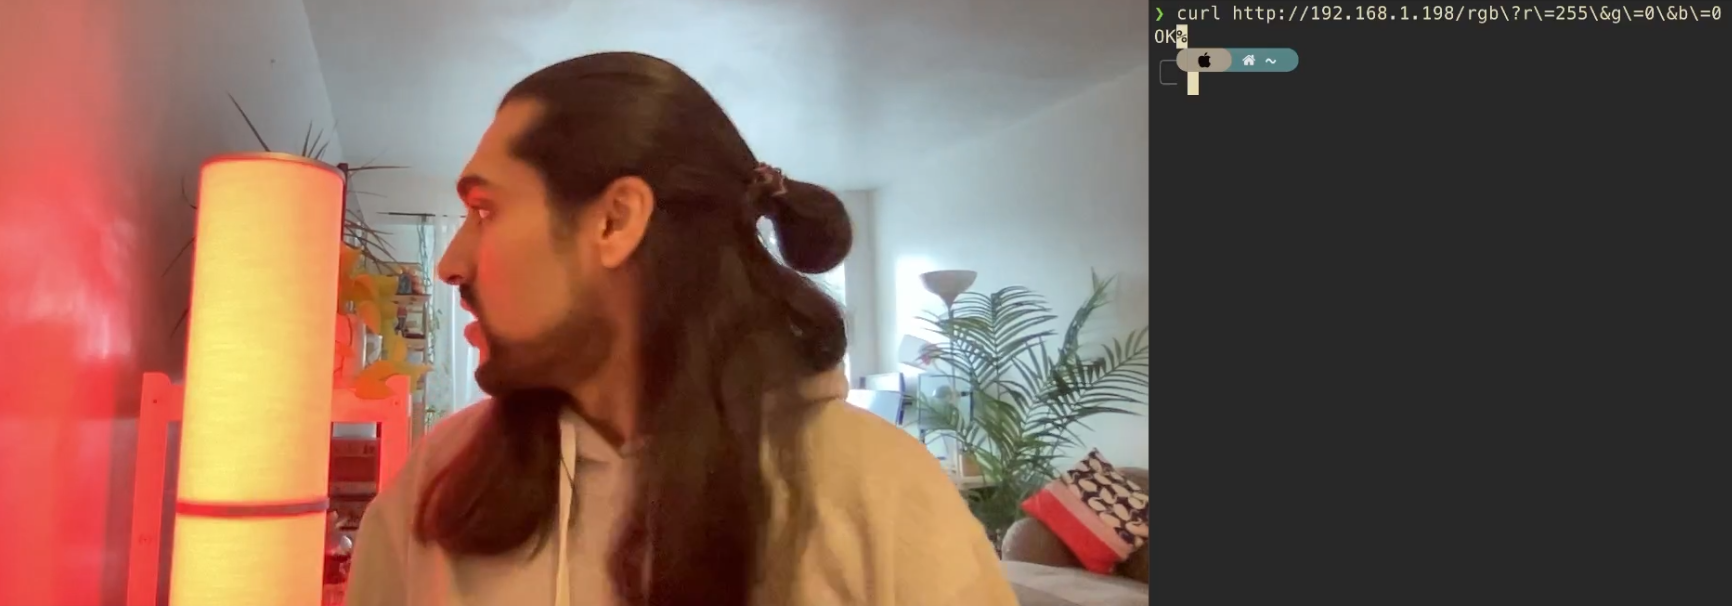
main.start_server()In your browser, or using curl from the command-line, type in your ESP32's IP address and see its glorious and not-very-creative response to you:

Great! The ESP32 is communicating over the interwebz! Well, technically it's just communicating on the local network but you get the point. If you want to use the curl command instead of the browser, that works as well:
Exposing an API for RGB
Alright, enough of that. We're not here to simply learn 'Hello world'. Let's dig in deeper. We want to expose our existing Neopixel functions, such as setRGB, to the web so that we can control the lights using HTTP requests instead of having to use WebREPL to call the functions. Ideally, we should be able to change the colour of the lights using an URL like http://<ip_address>/rgb?r=255&g=100&b=50. This is known in web parlance as a "GET request" and it has the "query parameters" r, g, and b. Using the Microdot library, we can access these parameters from the request object like so:
@app.route('/rgb')
async def rgb(request):
    setRGB((int(request.args['r']), int(request.args['g']), int(request.args['b'])))
    return 'OK'
Since the parameters in the HTTP request are represented as strings, we need to convert them to integers before sending them to the setRGB function. Also, when we are done, we need to return something (almost anything, really) to the HTTP client so that it knows the server has successfully serviced the request - in this case I chose to return the relatively mundane phrase 'OK'.
Let's try it out! Save the file, go to the WebREPL interface and send it to the ESP32. You may need to hit Ctrl+C in the console to kill the currently running server. After your new main.py is uploaded, hit Ctrl+D to restart the ESP32. Connect to it again, and run the server as we did before:
import main
main.start_server()
Use a browser or curl to try out changing the colours! For example, we can change it to an ominous shade of red.
Great! Play around with the colours as much as you like. Similarly, you can also create a new route called hsv to expose the ability to control the lights over the web using HSV colours. However, I will leave that as an exercise for the reader. If you really want, I do show how to do that in my video. But the code is almost the same as the rgb function so do give it a try first - you can do it!
Creating asynchronous tasks
Now for the complex/fun part - converting the setNiagara function to asynchronous and creating a route for it in the webserver. In this case, we need to think a little more about how to approach the problem. Before, when exposing setRGB to the server, we could just call it directly from the server route code because it executes very quickly and returns. However, the setNiagara function runs literally forever and never returns. So how will we call this infinitely-looping function while still giving processing time to the webserver to service new requests?
There are two parts to this: first, we need to call setNiagara in a separate task so that calling it doesn't block the webserver forever. This is done simply by using the function create_task and passing it our asynchronous function. Second, we need the setNiagara function to signal when it is idle so that other code (such as the webserver) knows when it's safe to hop in and start executing itself on the processor. But when is, if ever, is this function idle? And how will it signal this?
The trick is in the call to time.sleep at the end of setNiagara. While it sleeps, it is doing absolutely nothing, and it sleeps most of the time - just like a cat. We need to reclaim that sleep time to allow the webserver to run when setNiagara is idle. The way to do this is to use uasyncio.sleep instead of time.sleep and to use the await keyword to signal that this function is handing off control of the processor so that other tasks can run in the meantime.
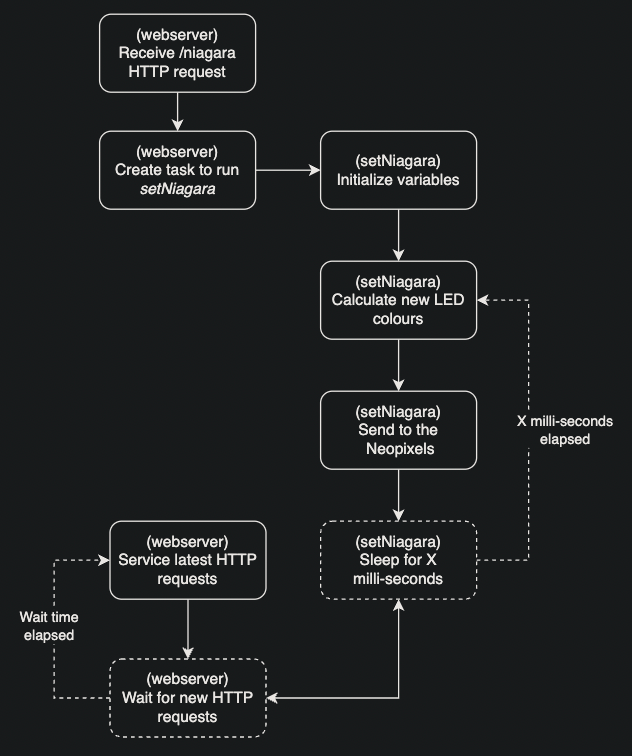
Having designed our approach, let's dive into the code! We'll start by implementing the webserver route for niagara.
@app.route('/niagara')
async def niagara(request):
    args_dict = {}
    for key in request.args.keys():
        args_dict[key] = int(request.args[key])

    uasyncio.create_task(setNiagara(**args_dict))
    return 'OK'
We first convert the request arguments to integers before using them. The only foreign concept in this code should be that I used "**" syntax to take the dictionary of request args and convert them into function parameters when calling setNiagara. I did this because all the function parameters are optional, and passing them in using a dictionary like this was the most convenient way. Note also how we use uasyncio.create_task instead of calling setNiagara directly.
Next up, we need to modify the setNiagara function to make it async-friendly. Change the function signature and the very last line to the following:
async def setNiagara(sat=255,.....
    ...
    ...
    ...
        await uasyncio.sleep_ms(delay_ms)
All we did was add async in the function signature and change the time.sleep to the asynchronous version in the final line.
Handling duplicate tasks
So that's it! Or is it? Muhahahaha - there is one more detail that adds to the complexity. Consider this: what will happen if someone makes two HTTP requests in a row to the /niagara endpoint? Pandemonium is what will happen! The code, as written above, will create two tasks for setNiagara and the Neopixels will flicker like crazy as they dutifully obey instructions from both tasks. We need a strategy to avoid that.
To avoid this, we need to first cancel the previously running setNiagara task (if there is one) before kicking off the new one. This ensures there's only one animation task running at a given time. So we need to hold a reference to the new task we create and call the cancel method on it. But where in the code do we put this logic? Luckily, Microdot provides an easy way to do this using the before_request function decorator. In here we can put logic that should run before every HTTP request is handled. Let's dive into the code where we had instantiated the webserver and add our task reference and task cancelling logic there.
app = Microdot() # from before
current_task = None

@app.before_request
async def pre_request_handler(request):
    if current_task:
        current_task.cancel()
Let's also modify our niagara route handler to store a reference the newly created task in this current_task variable.
async def niagara(request): # from before
...
...
global current_task
current_task = uasyncio.create_task(setNiagara(**args_dict))
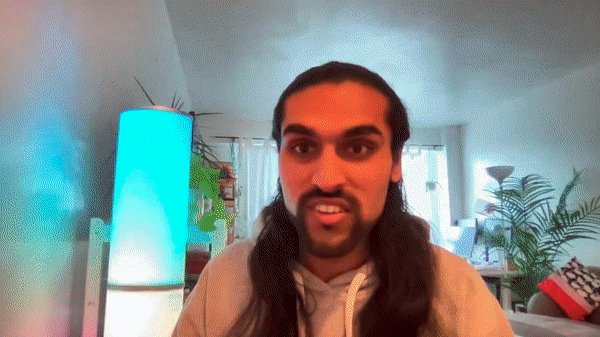
...That should do the trick! Kill the server currently running on your ESP32 using Ctrl+C, upload your latest main.py, and hit Ctrl+D to restart the microcontroller. Start the server from the command line and try out the new route! In your browser or in curl, hit the endpoint with a request such as this: http://<ip address>/niagara?sat=220&val=100&hue_gap=200. To test our task-cancelling logic, hit the endpoint again and make sure the lights don't start flickering madly!

At this point, the server implementation is complete and we should be confident in starting the server automatically when the ESP32 boots up, instead of us having to go in and manually start the server from WebREPL every time. So at the very bottom of your main.py, add a line to start the server when the file runs.
start_server()Upload this to your ESP32 over WebREPL and restart it. From now on, the server will run by itself and you don't need to use the WebREPL console anymore. Hurrah! The code is complete.
Smartphone control
As promised, let's learn how to control the Neopixels from the little glass & plastic computer in your pocket, a.k.a 'smart' phone. If you're running iOS, go ahead and download the API Tester app. On Android, download the Httper app. Both of these apps are simple HTTP clients that can send all kinds of HTTP requests and show you the responses. It's a great tool to control any web-connected projects you make, without having to develop an actual mobile app for each one.
Let's start by showing the iOS app. If you're using Android, skip ahead.
Controlling from iOS

In the URL field, type in http:// followed by your ESP32's IP address and route/endpoint (for e.g. /niagara or /rgb). Below that, you can click 'Add Param' to add the relevant query parameters for your endpoint. On the left you specify its name, and on the right its value. As you fill these in, it will automatically populate them at the end of your URL string in the text box above. When you're ready to send the request to your ESP32, click the 'play' button at the top-right to fire it off! You should get the response 'OK' from your ESP32. Use the tabs at the bottom to switch back to the 'Request' pane when you want to send a new HTTP request.
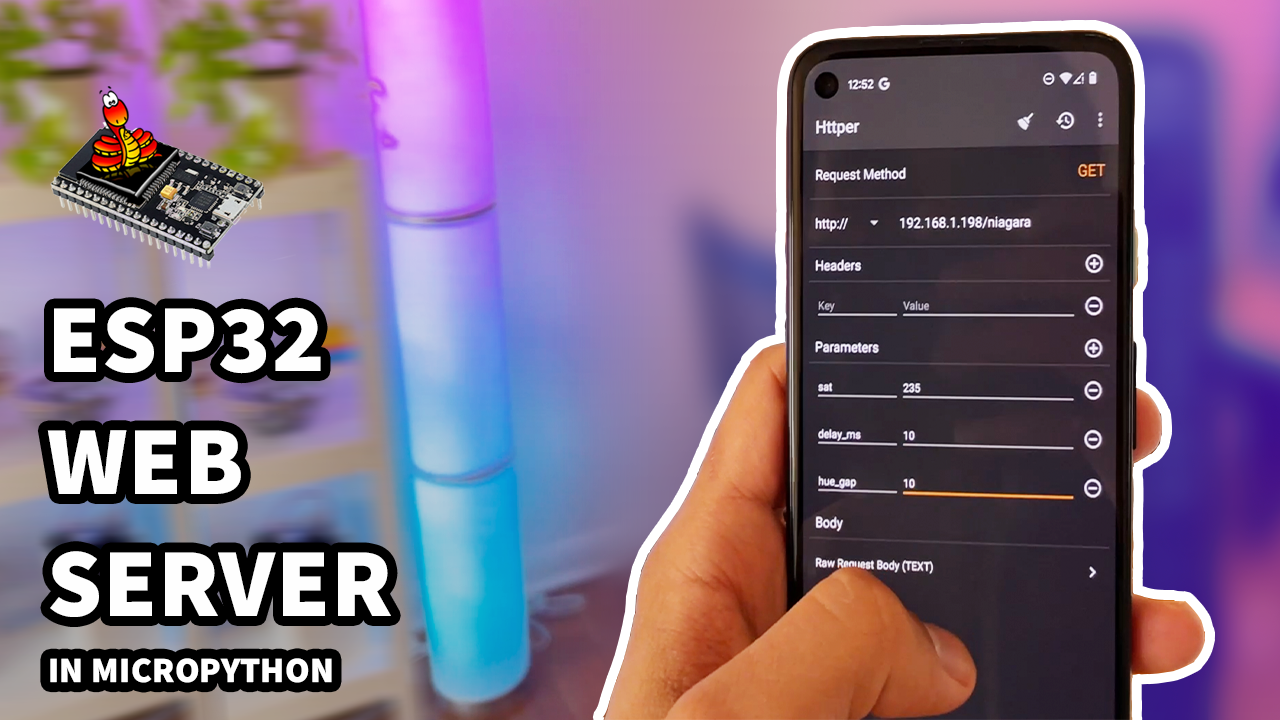
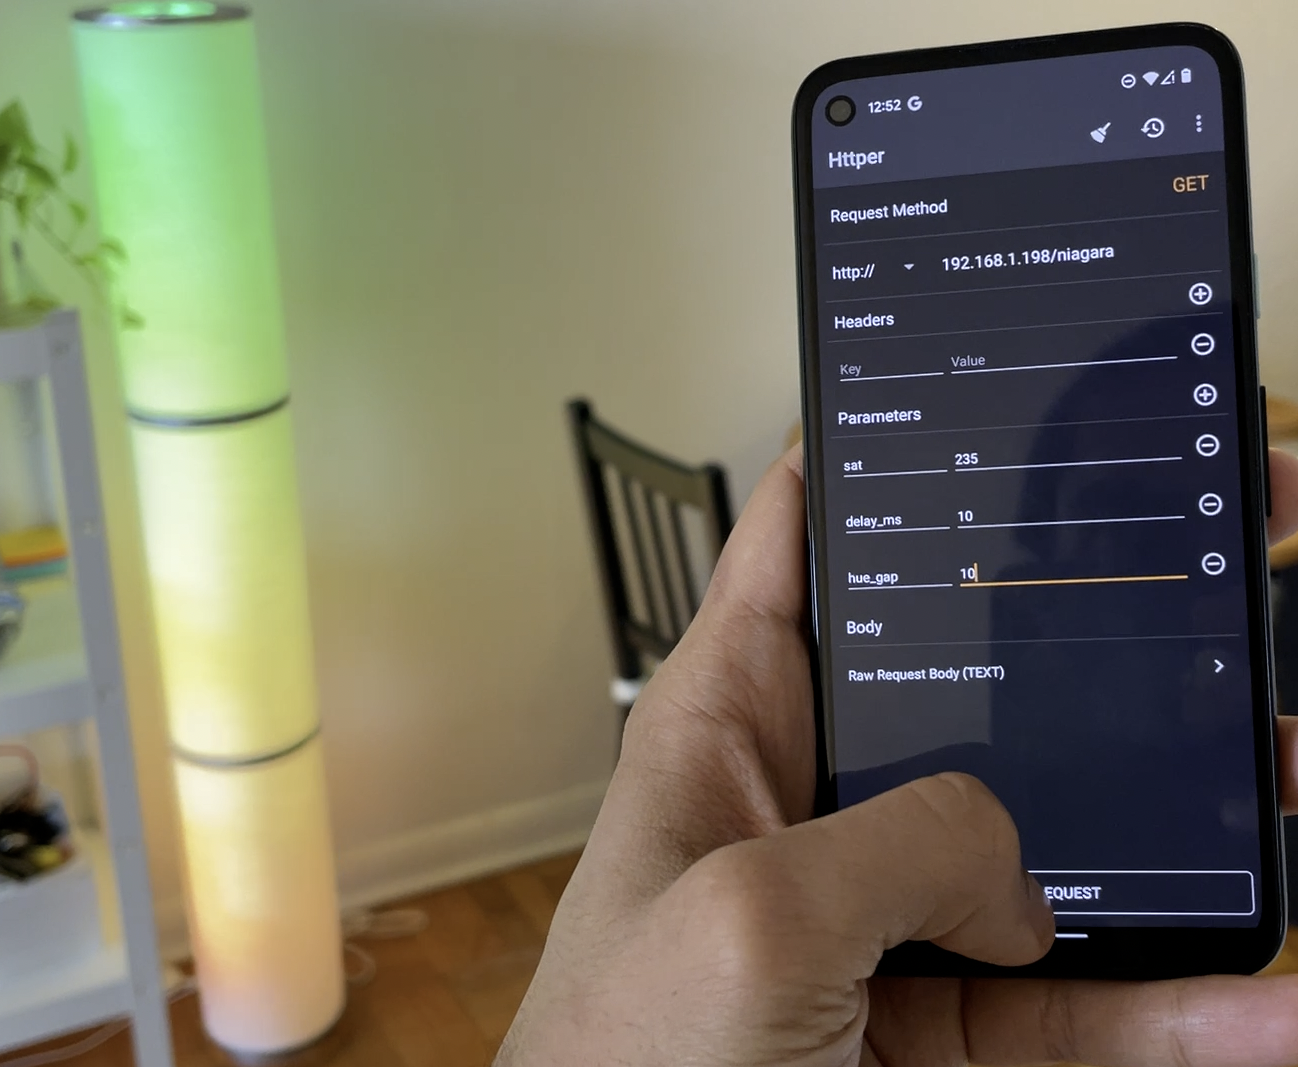
Controlling from Android
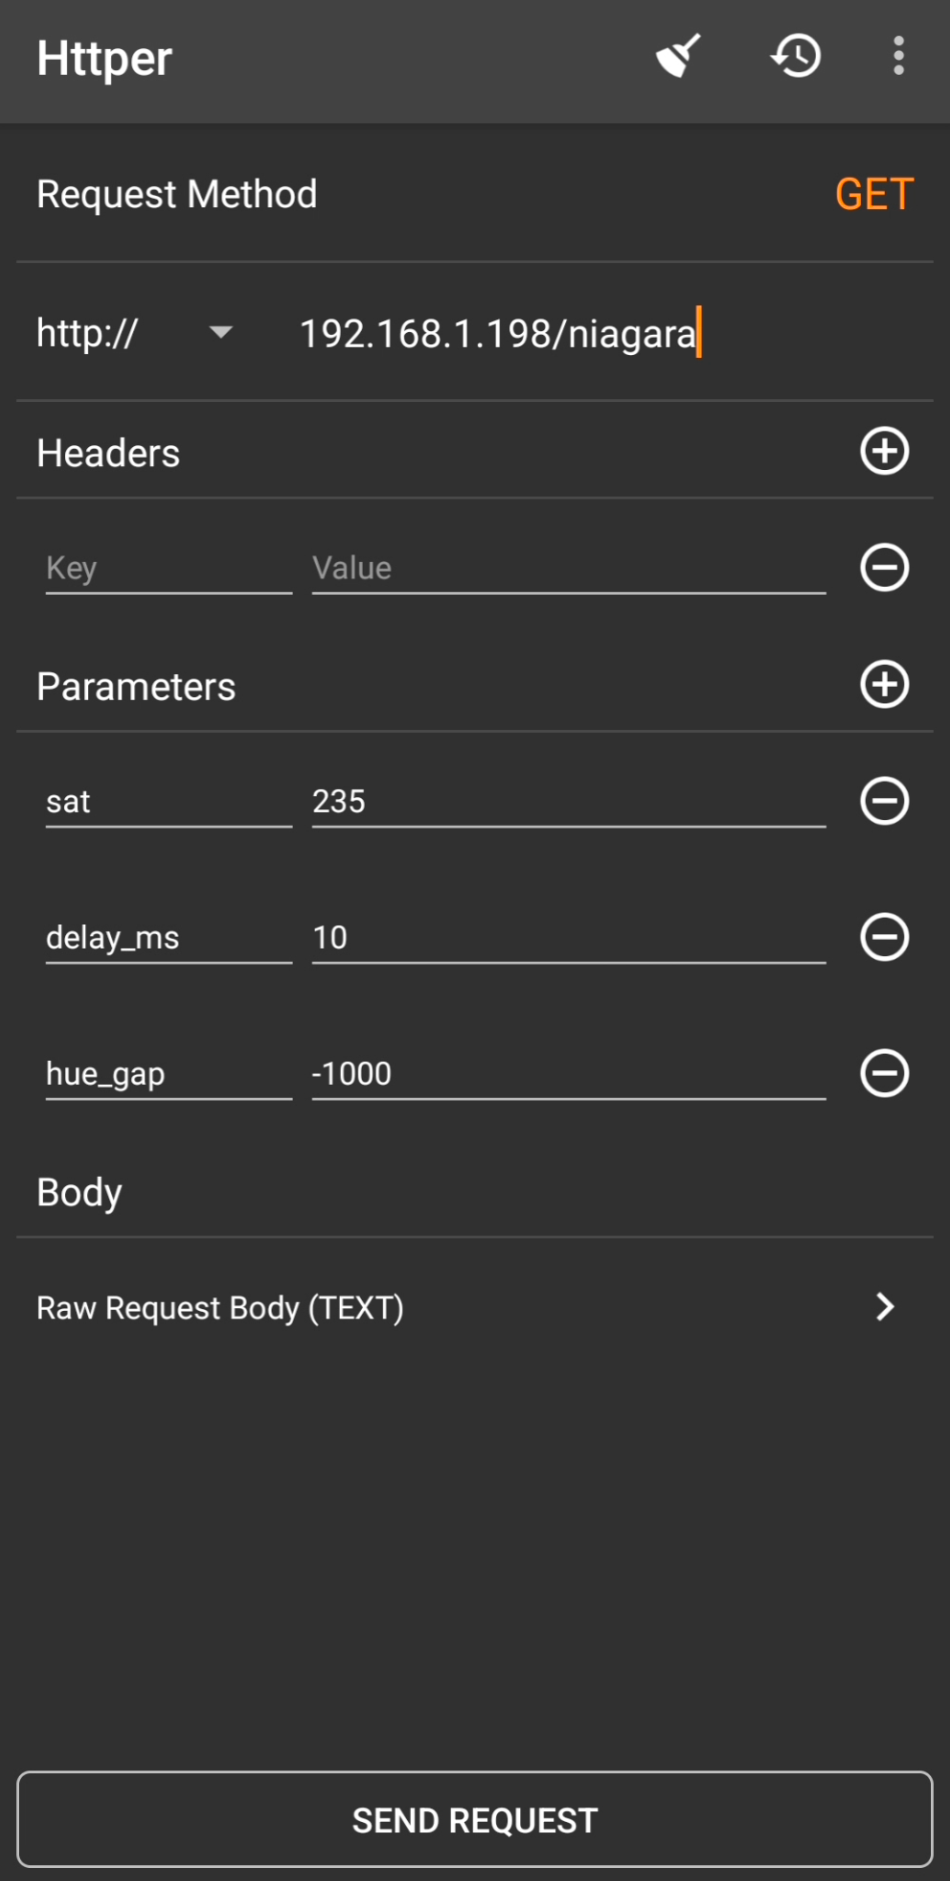
In the URL field, type in your ESP32's IP address followed by a route/endpoint (for e.g. /niagara or /rgb). Below that, you can click the '+' button in the Parameters menu to add the relevant query parameters for your endpoint. On the left you specify its name, and on the right its value. When you're ready to send the request to your ESP32, click the 'Send Request' button at the bottom to fire it off! You should get the response 'OK' from your ESP32. Click/swipe back to go back to the main page when you want to send a new HTTP request. In the top right, there is a convenient 'history' button (shaped like a clock inside a 'refresh' icon) which shows your history of HTTP requests, each of which you can click on repeat requests that you've sent before.
Conclusion
Microdot is a fantastic webserver library similar to Flask that abstracts away the nitty-gritty details of low-level network programming, and allows us to write an awesome server in just a few lines of code. It's changing the paradigm of microcontroller IoT programming from one where we had to manually deal with bytes and packets, to one where we can expressively do web programming just like we do on the desktop.
I hope you enjoyed using it as much as I did! I am glad that I can now control my home Neopixels setup from my phone instead of having to pull out a laptop and log into WebREPL every time. I am excited to see what awesome projects you create with your newfound knowledge! ?
For more awesome Micropython tutorials, click the Follow/Subscribe button below and I'll email them to you hot and fresh when they're released. I release one every 1-2 weeks so I won't spam you!
If you have any questions or wanna chat with me, hit me up on twitter! There you'll see updates on what projects I'm working on and my nerdy thoughts about hardware and coding.
That's it for today! See you next time on.....Ssssecrets of Micropythththon ?