
Secrets of MicroPython: MQTT on ESP32
What if you want to remote control a drone, or create a smart home lighting system, or collect sensor data from many devices? Enter MQTT: a robust and flexible IoT protocol that lets us do all that and more!

Why?
So far, we've communicated with our ESP32 in a couple of ways: USB-serial and HTTP. These protocols are great, but each has their flaws. USB requires a wire between your computer and microcontroller, and HTTP can be used wirelessly but it has a huge data overhead and it's inflexible as it requires all devices to know each other's addresses/hostnames. Enter MQTT: a low data protocol that works on regular wireless networks and allows for any number of microcontrollers, servers and computers to easily connect to each other!
If you're ever creating an IoT project where at least two microcontrollers need to connect to each other or to a "central command" computer, MQTT is your best bet. It's a very robust protocol that ensures that messages between devices will get delivered, even in lossy networks. It's also a flexible protocol in that any device can join or leave the network freely at any time, and send messages to any other device on the network without knowing its address.
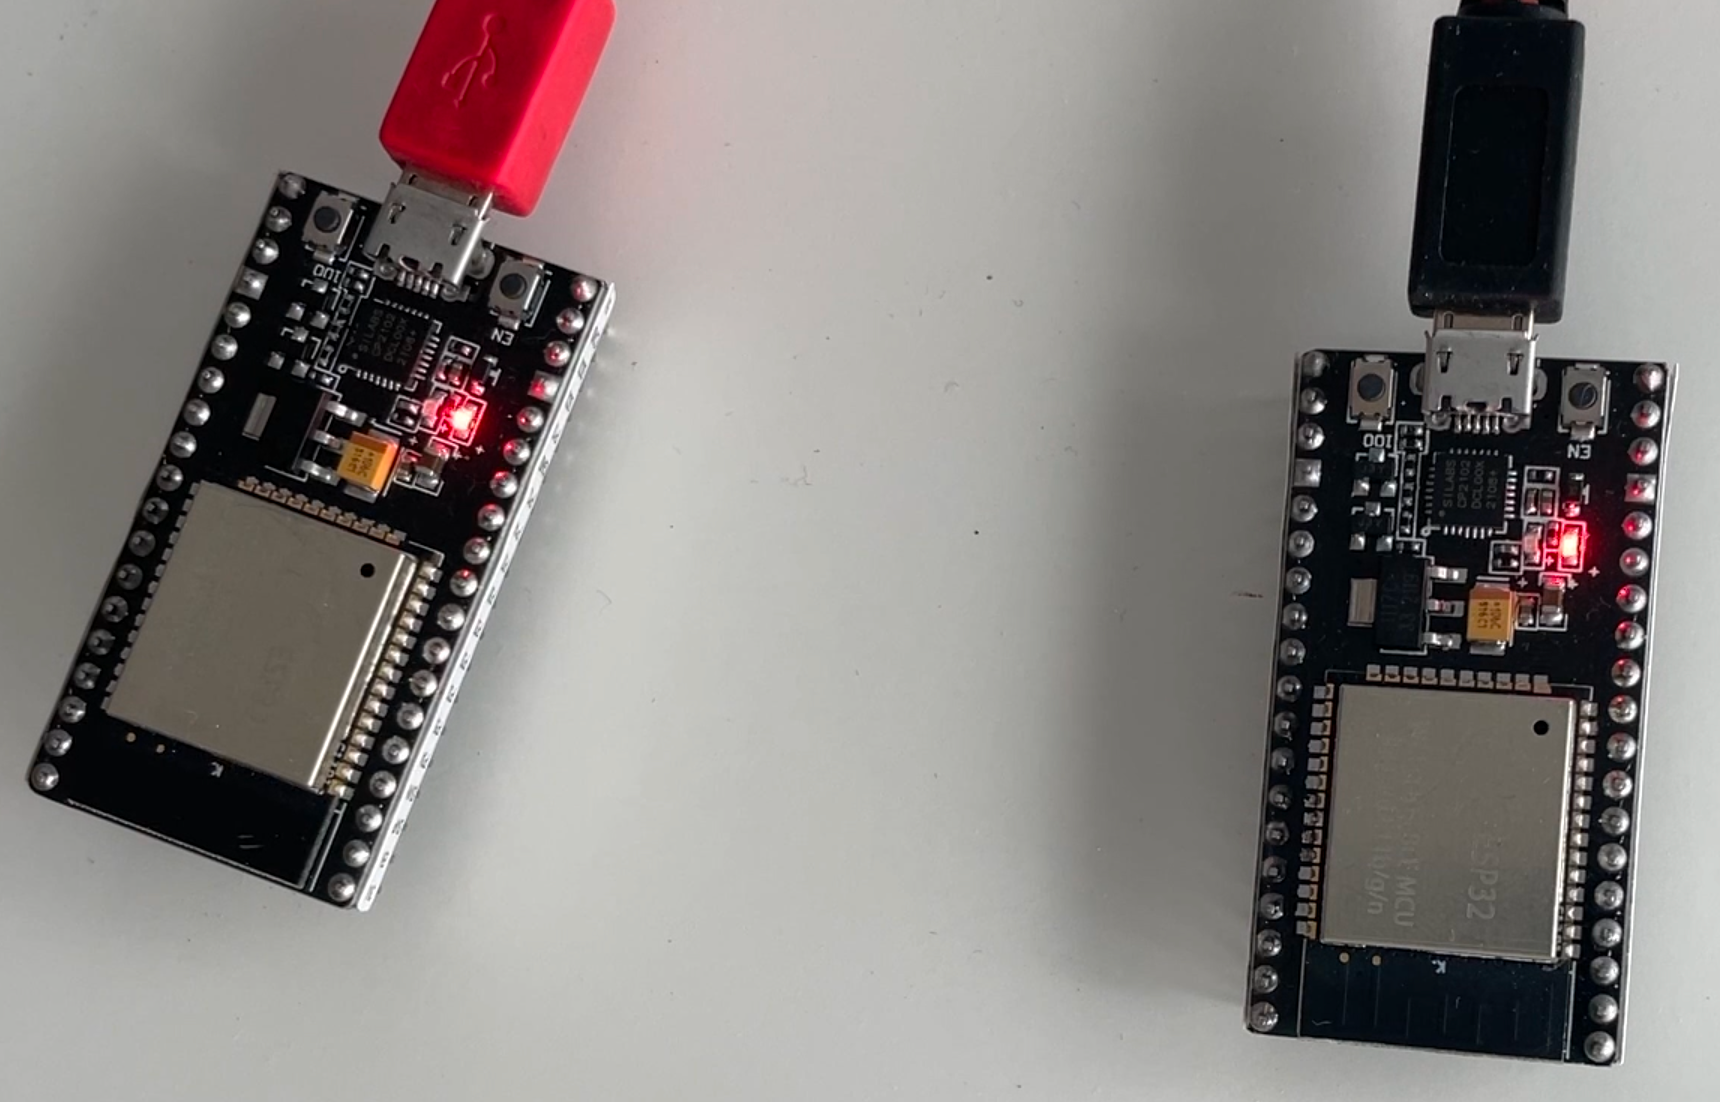
In today's tutorial, we'll create a remote-control LED system where two ESP32s can switch on each other's LED. This is what it'll look like, so I hope you're excited!

We'll get comfortable with MQTT using the umqtt library. So read on OR watch the video below to get a hands-on introduction to MQTT in MicroPython! If you'd like to follow along - I highly recommend you do - you will just need two ESP32 dev boards of any kind.
1. MQTT Architecture
MQTT is a publish-subscribe protocol with a client-broker architecture. Don't worry - that sentence meant nothing absolutely nothing to me when I first heard it too. So let's try a diagram instead:
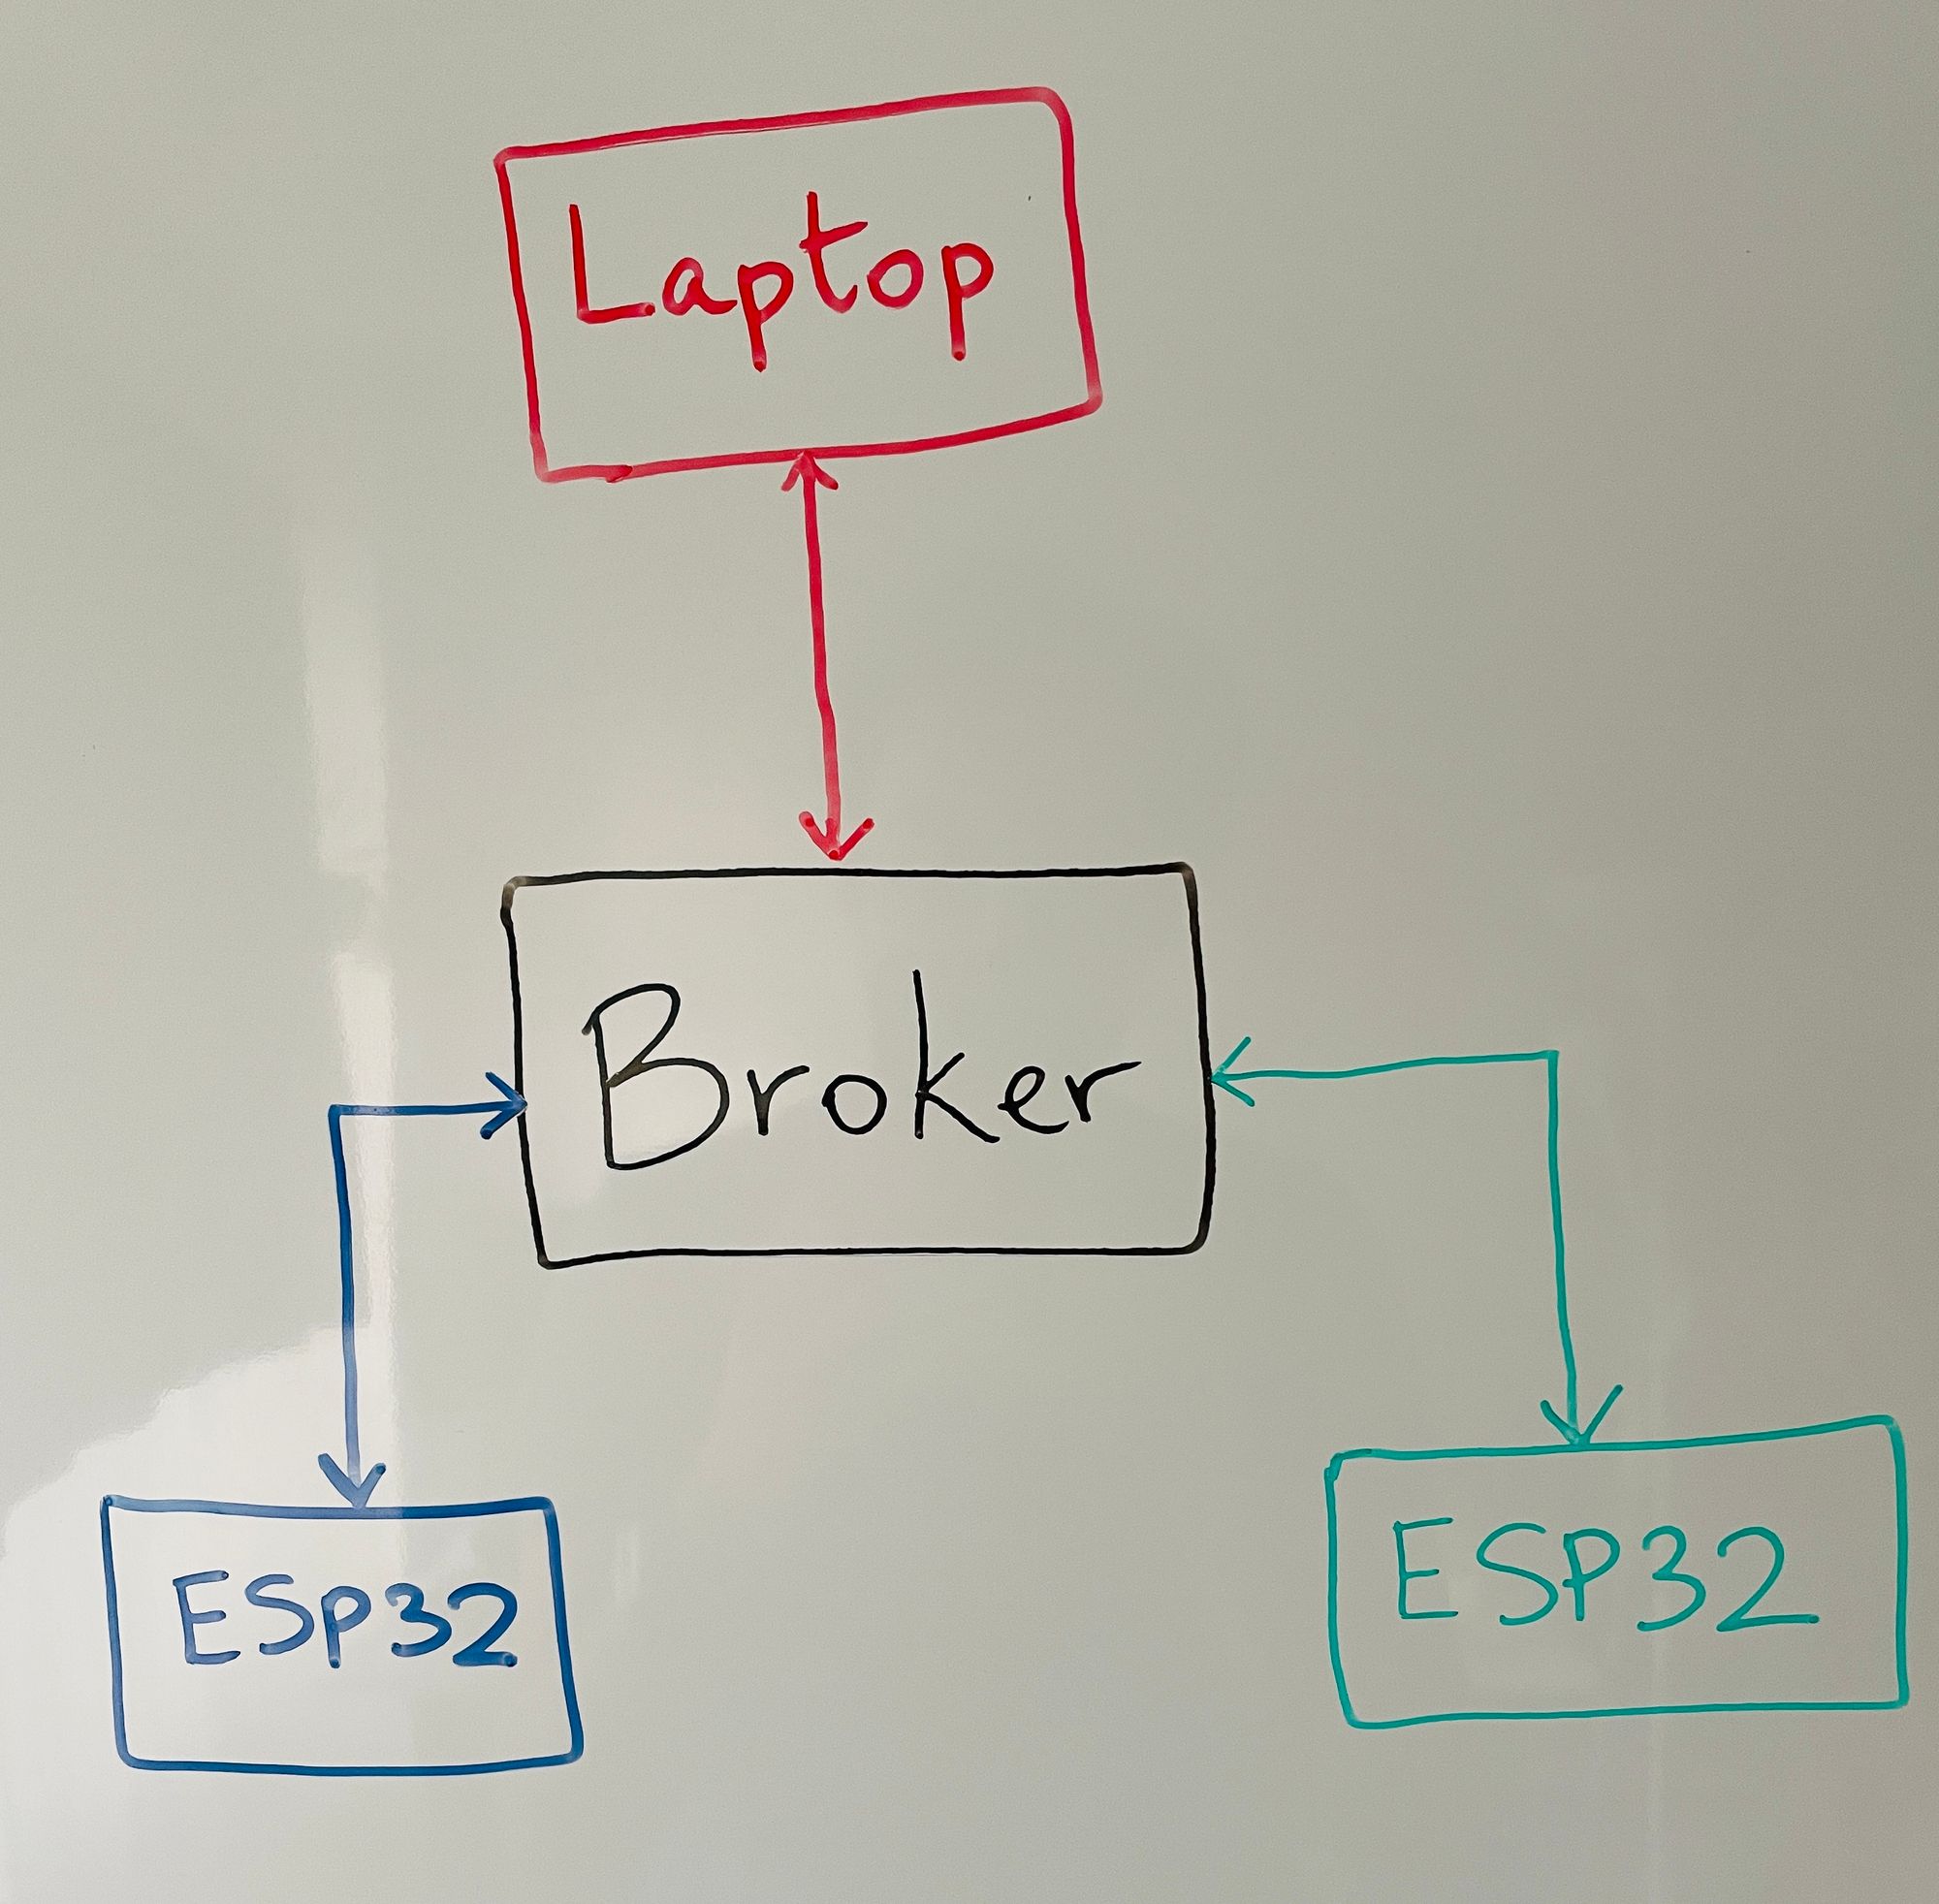
The main node in an MQTT network is the broker. Instead of brokering stock deals or international customs, it does the arguably more fun job of ferrying your devices' messages to each other. Every device (a.k.a client) must connect to the broker in order to participate, since all messages go through the broker. But how does the broker know which messages to send where?
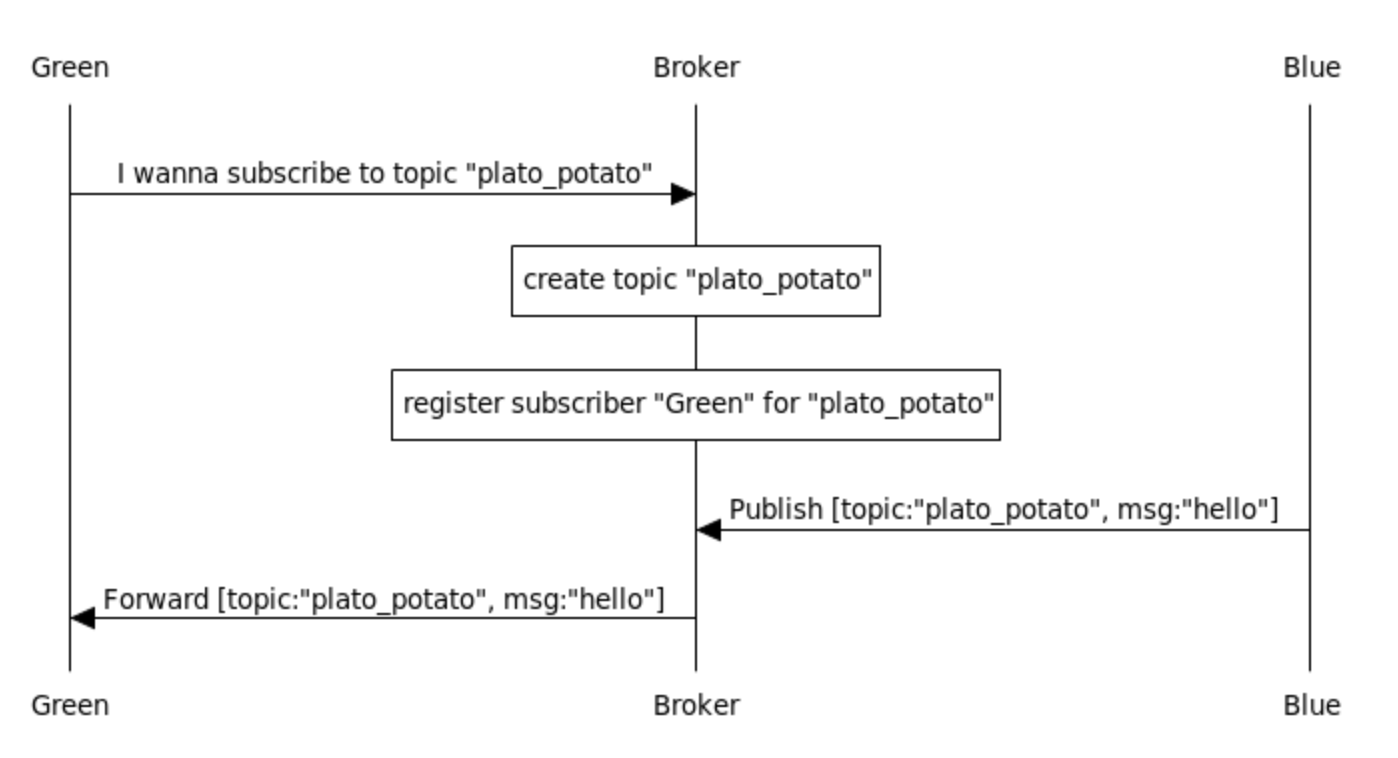
That's where publish-subscribe, or pub-sub for short, comes in. Each device in the network can publish messages to any topic. Whenever they do, the broker will receive that message and forward it to all of that topic's subscribers. A topic can be any string you choose, like "/kitchen/light/1/set" or "/bedroom/coffee/start" or "plato_potato" - it doesn't matter as long as the publisher and subscriber agree to use the same one(s).
Finally, you may be wondering - how does the broker know which topics exist, who is publishing on them and who is subscribed to them? It knows because every device that wants to publish or subscribe communicates its "intent" to the broker, using the MQTT protocol. Let's put all the above knowledge into a diagram to understand the sequence of the protocol in a simple scenario.
2. Configuring the broker
To create our own MQTT setup, we first need to install a broker. There's a fantastic, open-source broker called mosquitto (with two 't's) that you can download here. After installing it, we need to add a couple of lines to the config file in order to allow us to connect to other devices (i.e. our ESP32 microcontrollers) on the network.
Find the location of the mosquitto config file, based on your OS. For e.g. on macOS it's located at /opt/homebrew/etc/mosquitto/mosquitto.conf. It will be different if you're on a different OS. Open this file in a text editor and all the way at the bottom of the file, add these two lines:
listener 1883
allow_anonymous true
The first line explicitly tells the broker to listen for incoming connections on port 1883, which is the default port number of the MQTT protocol. The second line allows "anonymous" connections, i.e. connections from any device on the network. This is useful right now during development as we are just working on a local network, and it makes it easy to connect to our devices. However, if and when you eventually run this in a production system, it's better to not allow this setting for security reasons and to use a username + password for device authentication.
Save the file and we are good to go! Test out the broker by running the mosquitto command while passing in our config file using the -c flag:
mosquitto -c /opt/homebrew/etc/mosquitto/mosquitto.confYou should see output similar to below:
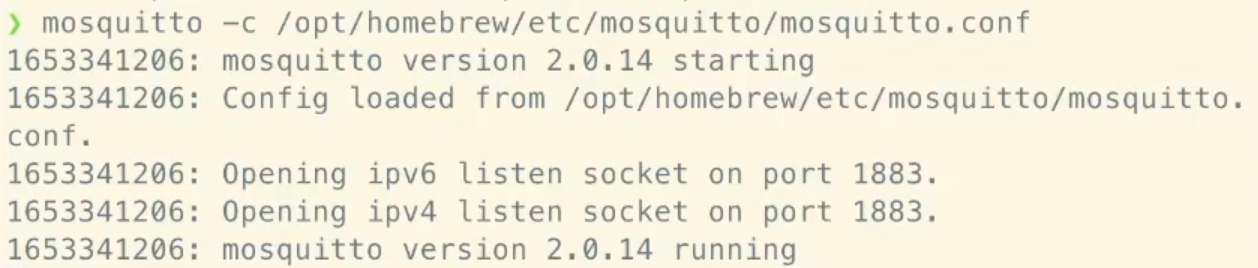
You may have a different version of mosquitto installed, or a different location for your config file based on your OS. But everything else should be more or less the same. Yay! Now that the broker is running, we can connect to it and send messages.
3. Publishing and Subscribing
Before we send message to/from our microcontrollers, it's good to do a local test to see if the broker is working correctly. Luckily, when you install mosquitto, you also get two cool command line utilities for interacting with it: mosquitto_pub and mosquitto_sub. To play with these, let's start by creating a subscriber for the topic 'hello':
mosquitto_sub -v -t 'hello'The -v flag means 'verbose', i.e. show full details of every published message. The -t flag means 'topic' and is followed by our desired topic name. After running this command, you may notice in the terminal where your broker is running that it prints a message saying "new client connected", like so:

Great! So our subscriber successfully registered with the broker. In a new terminal, let's try publishing a message:
mosquitto_pub -t 'hello' -m 'my name is blah'When you hit <enter>, you should see this topic and message in the terminal where our subscriber is running:

It works! The broker has successfully forwarded the message from the publisher to the subscriber. We can now kill these programs and head on over to our Thonny editor to play with MQTT in MicroPython land.
4. Connecting ESP32 to WiFi
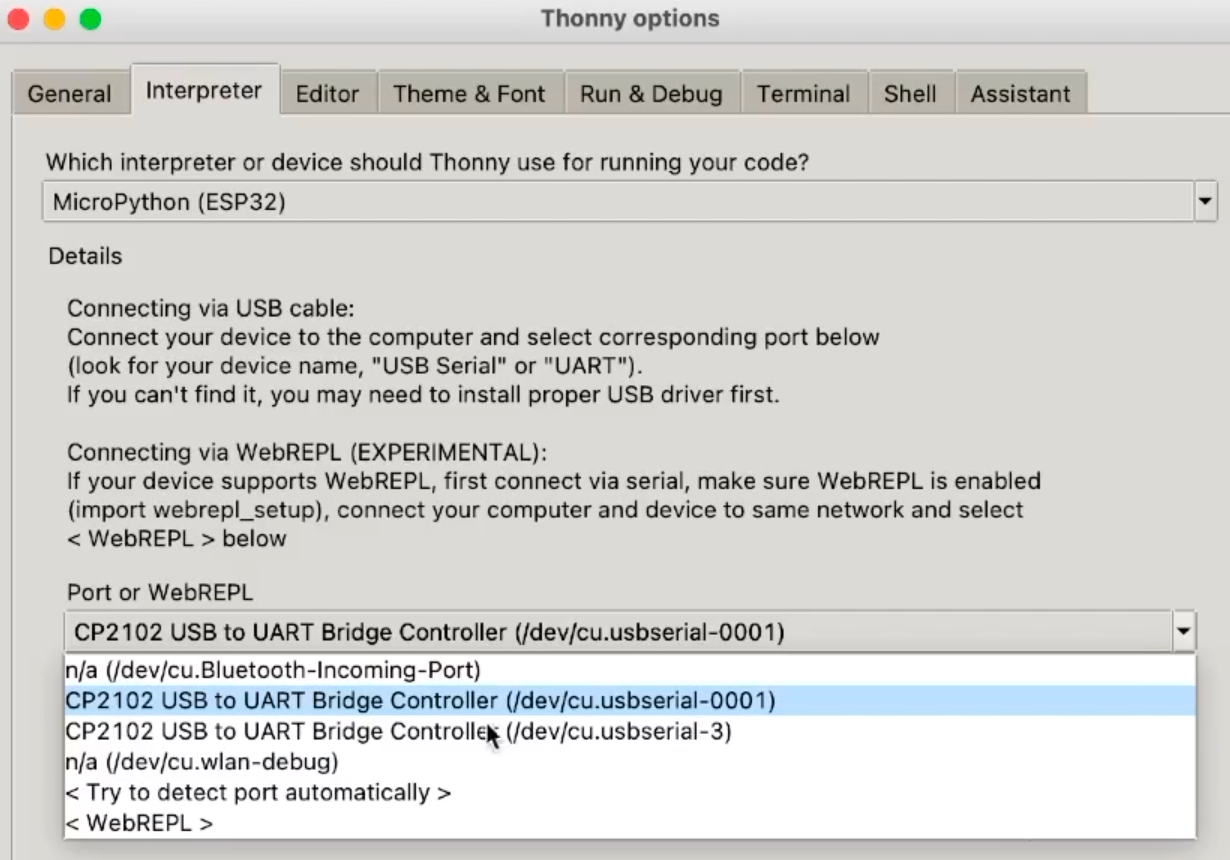
To get started, connect both your ESP32s to your computer and select one of them in Thonny's Interpreter options menu as shown below. It'll show up as a "USB to UART Bridge Controller" device. From now on, I'll refer to this first ESP32 as 'blue'.
Once you've selected it, click 'OK' and jump into the editor. You want to connect this ESP32 to your WiFi network by creating a boot.py file on your microcontroller and copying in the boilerplate code below. Make sure to replace the 'WIFI_NAME' and 'WIFI_PASS' strings with your own home WiFi network name and password. Save this to the microcontroller.
# boot.py
def connect():
import network
sta_if = network.WLAN(network.STA_IF)
if not sta_if.isconnected():
sta_if.active(True)
sta_if.connect('WIFI_NAME', 'WIFI_PASS')
while not sta_if.isconnected():
pass # wait till connection
print('network config:', sta_if.ifconfig())
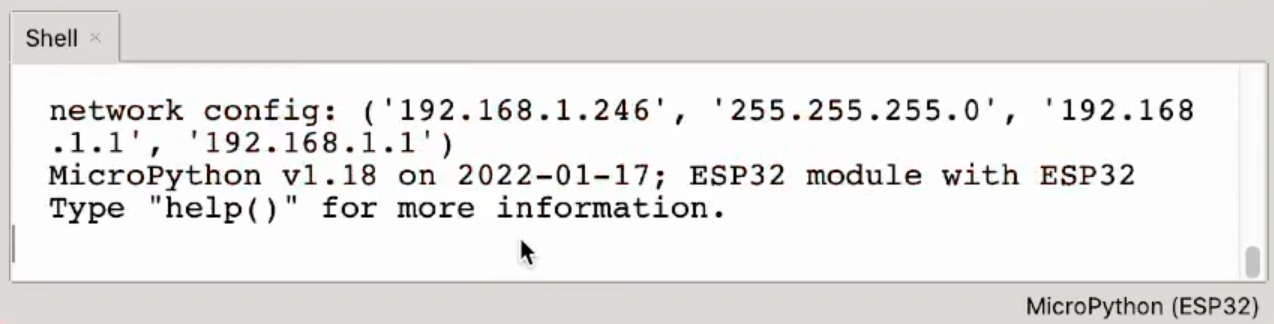
connect()Restart your microcontroller to check if the automatic WiFi connection on boot-up worked. You should see output similar to this in the Thonny shell:
Sweet! Now we're ready to write our app.
5. Connecting ESP32 to MQTT broker
The MicroPython build for ESP32 comes pre-packed with a lot of goodies, and today we'll be using the awesome built-in umqtt library. Create a new file called main.py and type in the following to test out our ability to connect to our mosquitto broker:
# main.py
from umqtt.simple import MQTTClient

CLIENT_NAME = 'blue'
BROKER_ADDR = '<your-computer-ip-address>'
mqttc = MQTTClient(CLIENT_NAME, BROKER_ADDR, keepalive=60)
mqttc.connect()
At the beginning, we import the MQTTClient class from umqtt. We then set the parameters needed to initialize the MQTT client. As mentioned before, this ESP32 will be called 'blue'. If you're not sure how to get your computer's IP address (where your broker is running), it's a simple command on all operating systems. For example on macOS the command is simply ip. Make sure to put that as a string in the code. Finally, we need to set a keepalive time (in seconds) which signals to the broker "if I don't send any message to you in X seconds, you can assume I've disconnected". This parameter is necessary so don't omit it. Plus it's actually helpful in that it prevents the broker from holding on to stale connections, so it's a good idea to do anyway.
Save this main.py file to the ESP32 and restart the microcontroller. When it starts up, it should immediately connect to your broker and if everything worked, you should see a similar message to below in the terminal where your broker is running:

If you want to be extra careful, you can check that the IP address mentioned here matches the one you see in the Thonny shell. Also notice that the broker totally knows the name ('blue') of the device that connected. Let's take it a step further and publish messages.
6. Publishing from ESP32
The umqtt library also gives the ability to publish messages. To do so, we simply need a topic name and a string message that we want to publish. Let's make things interesting here! Instead of just passing "hello" back and forth (boring), let's make each ESP32 a remote controller for the other ESP32's LED. That is, when you press the button on one ESP32 it should light up the other one, and vice versa.
When naming an MQTT topic, it's good practice to name it in a "folder"-like structure with forward slashes between each level. In our case I'd like to make the first level the name of the device ('blue'), the second level the name of the hardware peripheral ('btn'), and the third level the number of the GPIO pin ('0' in the case of this ESP32 board I bought off Amazon). If you think this is a silly naming scheme, or it's overkill for this project (it is) then feel free to name the topic whatever you like! Putting it all together, my topic name is 'blue/btn/0'.
Let's modify the code from so that we initialize our GPIO button and publish that GPIO pin's value every half-second:
# main.py
from umqtt.simple import MQTTClient
from machine import Pin
from time import sleep

### --- same as before ---
CLIENT_NAME = 'blue'
BROKER_ADDR = '<your-computer-ip-address>'
mqttc = MQTTClient(CLIENT_NAME, BROKER_ADDR, keepalive=60)
mqttc.connect()
### ----------------------

# button setup
btn = Pin(0)
BTN_TOPIC = CLIENT_NAME.encode() + b'/btn/0'

while True:
	mqttc.publish( BTN_TOPIC, str(btn.value()).encode() )
	sleep(0.5)
This time, we've added the GPIO setup code for the button. On my ESP32 board, the button is on pin 0 - check your board's pinout diagram to find out which pin your button's on. Right below that, I've created a variable called BTN_TOPIC that stores our MQTT topic. "But wait a minute!", you say, "I thought you said that MQTT topics are strings! Why is BTN_TOPIC a bytes object?"
Well yes, I may have lied a bit. In fact, both of the parameters to mqttc.publish() must be bytes objects. However, to make our lives easier, I want the topic and message to be human-readable in the terminal. Hence the decision to make them strings first, and then use encode() to convert them to bytes. This way, when we subscribe to this topic on our computer, we can see exactly the topic name and the contents of each message.
Let's try it out! Save main.py to your ESP32 and restart the microcontroller. Make sure your broker is still running on your computer, and in a new terminal window let's create a subscriber as follows:
mosquitto_sub -v -t 'blue/btn/0'If everything's good, you should start receiving messages in the terminal. Try pressing the button and see if the message changes from 1 to 0 and vice versa:
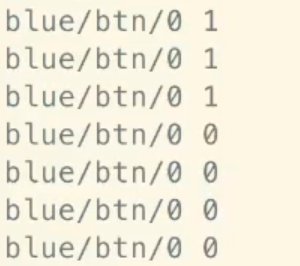
On my board, the button is wired active-low so its GPIO value is 1 when it is not pressed, and 0 when I press the button.
Great! So we have working code for publishing the microcontroller's button status. Next, let's write some code to subscribe to MQTT messages.
7. Subscribing from ESP32
Since our overall goal is to remote control each ESP32's LED from the other one, we need to be able to subscribe to the other ESP32's button messages so we know when to turn our light on.
To create a subscription, we need two things: a topic and a callback function. In this case, the topic will be 'green/btn/0' since we're interested in the other microcontroller's button status. The callback function should simply decode the button value in the message and switch on/off the LED based on that. So let's modify our code further to initialize the LED, initialize the subscription, and check for new messages in the main loop:
# main.py

### --- same as before ---
from umqtt.simple import MQTTClient
from machine import Pin
from time import sleep

# mqtt client setup
CLIENT_NAME = 'blue'
BROKER_ADDR = '<your-computer-ip-address>'
mqttc = MQTTClient(CLIENT_NAME, BROKER_ADDR, keepalive=60)
mqttc.connect()

# button setup
btn = Pin(0)
BTN_TOPIC = CLIENT_NAME.encode() + b'/btn/0'
### -----------------------

# led setup
led = Pin(2, Pin.OUT)
LED_TOPIC = b'green/btn/0'

def blink_led(topic, msg):
    if msg.decode() == '1':
        led.value(0)
    else:
        led.value(1)

# mqtt subscription
mqttc.set_callback(blink_led)
mqttc.subscribe(LED_TOPIC)

while True:
    mqttc.publish( BTN_TOPIC, str(btn.value()).encode() )
    mqttc.check_msg()
    sleep(0.5)
First, we've added code to initialize the GPIO for the LED on pin 2. Again, check your board's pinout diagram to determine which pin your LED is on. Next, we've created LED_TOPIC which is the other ESP32 ('green')'s button topic.
Our callback, blink_led(), simply decodes (i.e. convert from bytes to str) and checks the message. If it's a '1', that means the button is not pressed so the LED should be off. If it's a '0', that means the button is pressed and we should switch on our LED.
Next, we attach our blink_led callback to the MQTT client and create the subscription for LED_TOPIC. Finally, in the main loop, we must run check_msg() periodically so that the callback can get triggered for newly received messages.
Whew! This is the last of the code, I promise. We have a device which every 0.5 seconds (a) publishes it's own button value, and (b) sets its own LED based on the button message of the 'green' microcontroller. Before we bring the other ESP32 into the mix, let's quickly test out this new LED capability using the mosquitto_pub command line tool. Save main.py on your ESP32 and restart it, then in a new terminal try:
mosquitto_pub -t 'green/btn/0' -m '1'
...
mosquitto_pub -t 'green/btn/0' -m '0'
When you send a '1', the LED should be off...and vice versa. Check out this cool GIF that totally proves it.
Wahoo! I've never been so excited to remote control an LED. For our last step, let's bring it all together and control both microcontrollers from each other.
8. Final demo
This step is quite easy. Save all the code from boot.py and main.py on your computer first, and close the editor tab. In your Thonny options, in the Interpreter pane, change the Port to the other microcontroller's USB-UART port. Back in the editor, we can create a new boot.py and main.py file for our second ESP32 and copy in the code for each. The only change to make is to change every 'blue' to 'green' and 'green' to 'blue' in the main.py code. Save these two files to the ESP32 and restart it.
You should now have a fully working system. Check it out!
Summary
MQTT is a very flexible protocol with low data overhead, that allows us to connect any device to each other without knowing any device's (except the broker's) IP address or hostname. In MicroPython, the umqtt library has all the features we need to connect to a broker, publish messages to topics, and set callbacks for subscribed topics.
I really hope you enjoyed this tutorial and learnt a lot about the power of MicroPython and MQTT. I hope it helps you in your awesome projects, whether they be smart home IoT systems, wearable projects, art installations, or even drones - MQTT is versatile enough to use in all of these scenarios.
If you found this valuable, I do post MicroPython tutorials once every ~2 weeks so do hit Follow/Subscribe below if you'd like me to email you when my next tutorial is out! I don't spam you so don't worry - it's just MicroPython tutorials. If you'd like to ask questions, give feedback or just chat then hit me up on twitter ?
That's it for today. See you next time on...Ssecretss of MicroPyththon ???