
Configure your MicroPython project with JSON files
Learn how to get your microcontroller to remember your settings, so you can quickly get it back in working state even if it loses power or reboots!

Why?
Say you have a working MicroPython project, and you accidentally unplug the power on your microcontroller. When you plug it back in, it will awaken like a reincarnated baby - completely unaware of its past life - and chug through your boot.py and main.py files, executing their code like it did the very first time you powered it on. In other words, it has no persistent memory of it's past execution.
For many projects, this is really bad. For example, you can create a colourful RGB lamp using MicroPython, which you can control from your phone. But if you set it to a beautiful colour that you want the microcontroller to "remember" between reboots, it won't work. Without persistent memory, the lamp will go back to its default hardcoded colour when you turn it on again.
But there is hope! Instead of just "forgetting" your colour setting, we can save the user's settings to the microcontroller's onboard flash memory. You'll learn how to do this on an ESP32 today, but the same principle applies no matter which microcontroller or programming language you use. The best part about using MicroPython for this technique (as opposed to C) is that it comes pre-baked with a full-fledged filesystem and an easy-to-use standard library for working with config files.
(If you learn better through video, you can watch it here! Or just skip past it to read the text version)
Keeping it simple with JSON
Storing configuration as a JSON (jay-sun? jace-on? juss-on?) file is great because MicroPython has a built-in ujson library that can read from and write to JSON files. Even better, it reads the JSON file straight into a normal Python dictionary, which makes the configuration data easy to work with. If you've worked on desktop or web software before, this approach to config files should be familiar to you.
To demonstrate this approach, let's build a simple ESP32 project that lets you toggle an LED by clicking a button, and remembers the LED's last state (on or off) even if it gets unplugged from power. Before we dive in to the code, let's draw out the program flow. It'll help us decide when the program should save the user's settings, and when it should load the previous settings.ÎÎ
Program flow
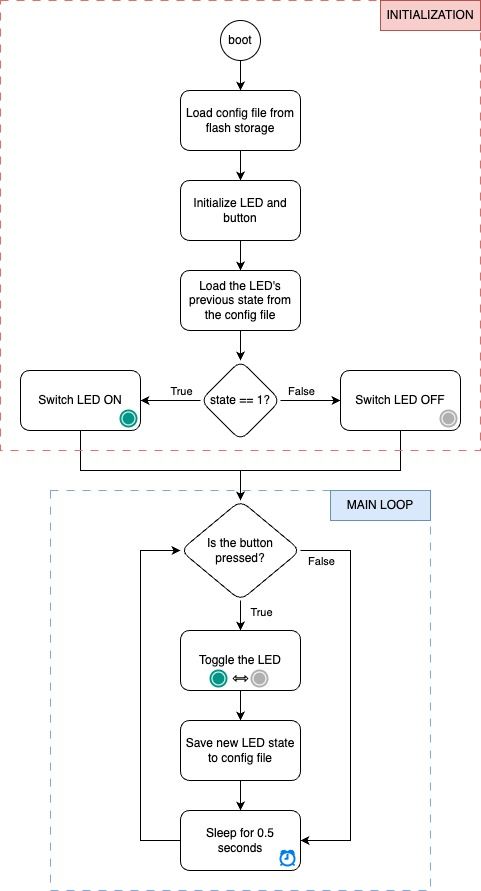
The program can be neatly divided into an initialization phase and a main loop. During initialization, we check the config file for the last known state of the LED and set the LED to this state right away. So before we get to the main loop, we've already matched the user's last setting.
In the main loop, we check for a button press from the user and toggle the LED. Every time we toggle the LED, it changes the state of the program. We capture this state change by saving the new state of the LED to the config file. This ensures that the next time the microcontroller boots up, it will set the LED to match the user's desired setting. That's it!
While this may seem like a very simple program, it demonstrates the powerful concept of state management. By storing and tracking the program's state in a separate data structure, you gain the ability to recreate any scenario in the program by simply modifying the config file. Managing state separately like this is a good practice that is used in a variety of domains, from database backed applications to modern front-end web development frameworks.
OK, enough design and theory. Let's convert it to code!
Coding it in MicroPython
We need to create just 2 files - the code and the config. Let's start with the config file, which in our case is just one line:
{"is_led_on": 0}config.jsonWe set is_led_on to 0 by default, which means the LED should be off. Notice how the JSON syntax is very similar to a (Micro)Python dictionary.
Next up is the MicroPython code. Note that this was tested on an ESP32 dev kit - if you have a different microcontroller, you may need to change the pin numbers for the LED and button to match your particular board. To start, let's load the config file and initialize the peripherals:
import json
from machine import Pin
from time import sleep

# load the config file from flash
with open("config.json") as f:
    config = json.load(f)

# init LED and button
led = Pin(2, Pin.OUT)
btn = Pin(0)
main.py init/setup codeWe use json.load to load the config file into a dictionary named config. Next, we need to define a function that can save the config dictionary back to the JSON file:
def save_config():
    """function to save the config dict to the JSON file"""
    with open("config.json", "w") as f:
        json.dump(config, f)
main.py - save_config functionThe function opens the config file in "w" i.e. write mode, grabs the global config dict, and json.dumps it into the file. MicroPython makes this so simple! We will be calling this function later in the main loop whenever the user presses the button.
Before we get to the main loop, we need to turn the LED to its initial state (on/off) depending on the user's last setting. This is as simple as setting the LED to the value from the config dict:
# load LED state from config file
led.value(config["is_led_on"])
main.py setting the LED to last known settingLastly, let's write the main loop. Every time the button is pressed (i.e. button's value is 0), we will toggle the LED, set the config dict to the LED's new value, and save the dict to the config file using the save_config() function we defined above:
# use button to toggle LED
while True:
    if btn.value() == 0:
        led.value(not led.value())
        config["is_led_on"] = led.value()
        save_config()

    sleep(0.5)
And that's pretty much it! All of that logic in about 30 lines of code. The same pattern - load state from config file at startup, save state to config file every time there's a change - can be applied to any MicroPython project, whether it be a fancy rainbow LED lamp or a tiny quadcopter.
I've open sourced this project and made the code available on GitHub.
To the MicroPython enjoyers
Do try this out in your own projects and let me know what you come up with! If you have any questions, tutorial requests, feedback, or just wanna chat, I'm here for you on Twitter/X (gawd I hate calling it "X").
If you found today's post valuable, I do post MicroPython tutorials once every 1-2 weeks so do hit Follow/Subscribe below if you'd like me to email you when my next tutorial is out! I don't spam you so don't worry - it's just useful MicroPython tutorials.
P.S. If you're wondering how I created the cover image for this tutorial. The image was generated using Bing Image Creator with the prompt: "red python snake carrying information text file to a sleeping cyborg life-support brain fluid tank, pastel colours, Alphonse Mucha style, hopeful."