
Secrets of MicroPython: More Fun with Neopixels!
Part two in the epic saga of programming Neopixels with MicroPython. Jump in and learn how to create fantastic colour patterns - no hardware needed!

(If this is your first time here, check out my first MicroPython tutorial. Use it to get acquainted with the Wokwi simulator interface so that you are prepared to dive into this tutorial).
Last time, in our intro to Neopixels tutorial, we learnt how colours are represented in computers and we used that knowledge to colour a ring of Neopixels/WS2812Bs using Micropython. That's just the beginning, though. Today we'll kick it up a notch and go into Neopixel overdrive! We'll learn to set individual Neopixels, play with saturation and brightness, and create colour patterns so fantastic that they'd put Ibiza's raves to shame.
Quick recap: in our previous tutorial, we had connected the Neopixel ring to the Pi Pico like so: VCC connected to the 3.3V supply pin, GND connected to any ground pin, and the DIN (Data In) pin connected to pin GP6. We had also pulled in blaz-r's Neopixel library from github (note: if you're following along on a real Raspberry Pi Pico instead of the Wokwi simulator, you don't need to copy this Neopixel library file to your project - it's already built-in). Finally, we wrote some basic code to control the pixels. To make your life easier, I'm providing the previous project link so that you can just jump in and get started today!
Addressing individual pixels
As we know, each Neopixel is a special little snowflake that yearns to express its individuality using unique colours. We will accomplish this using the set_pixel method in Micropython. This method takes two arguments: the first is the pixel number (starting from 0 for the 1st pixel), and the second argument is the colour. As before, we will use HSV representation to create our colours. Here's an example code snippet that sets the 3rd pixel to the colour green:
# the hue of pure green is 21845
# saturation and value/brightness are set to maximum
green = pixels.colorHSV(21845, 255, 255)

# pixel '2' is the third pixel, as numbering starts from zero
pixels.set_pixel(2, green)

# always remember to use 'show' to send the pattern to the Neopixels!
pixels.show()
Let's try it out! Set each pixel in the ring to red, green and blue in that order. We already have these 3 colours defined as constants so we can take advantage of them in the code. Modify the project code as shown below:
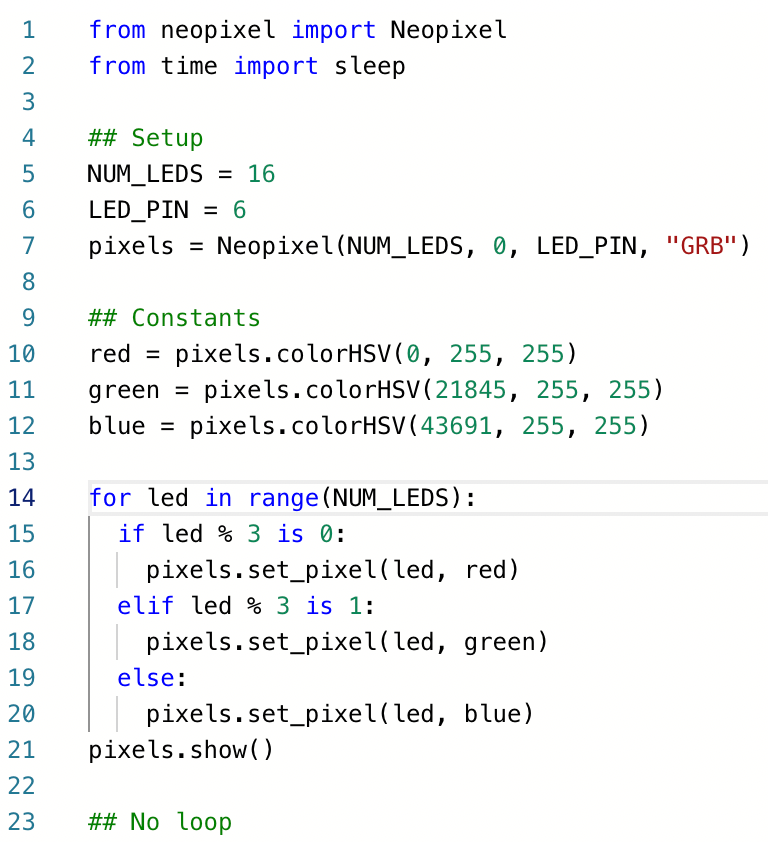
We use the modulus/'remainder' operator, %, to split the LEDs into groups of 3 and set the colour of each LED accordingly - red for the first LED in a group, green for the second and blue for the third. Run the code and check out the result.
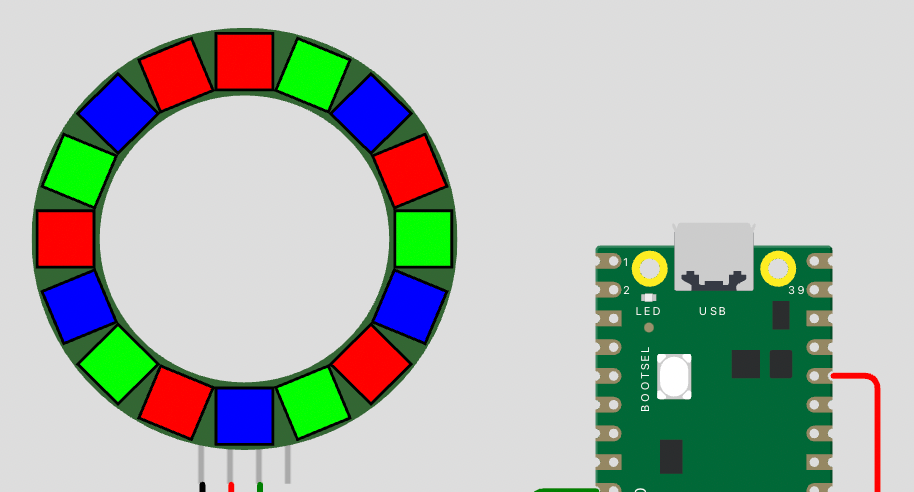
It worked! But we're just getting started. It would be a lot more exciting if we could set different colours to each LED and spin them right around (baby right 'round, like a record, baby) the hue spectrum! Let's move the pixel-setting logic into the main loop so that we can create a cycling rainbow that spins forever.
But what hues should we set the LEDs to? Well, we know that there are 65536 hues and 16 LEDs. If you divide those, you get a nice, clean 4096. This means that if we set the hue of each LED exactly ±4096 from its adjacent LEDs, we will create a perfect circular colour spectrum around the ring. To spin this spectrum, we will need to increment all the hues with each time-step of the main loop, as we did in our previous tutorial. If it's not clear why incrementing all the hues will cause the ring to spin, that's OK - let's play with it and you will gain an intuition of how it works.
We need to create a loop to cycle through all the hues, and a nested loop inside that loop to cycle through all the LEDs. We'll set the first LED to this 'starting' hue, and all subsequent LEDs to the previous LED's hue plus 4096. Let's modify our code to accomplish this.
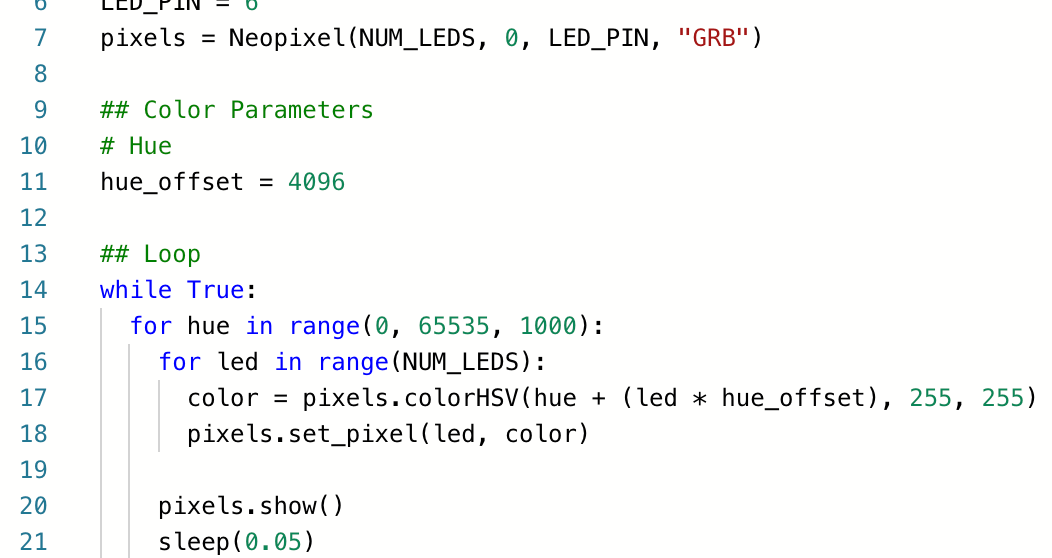
All the magic of that code happens in line #17: we take the 'starting' hue and add an offset of (4096 x LED position) to get the hue for each LED. Click 'play' at the top of the simulator window and watch it in action!
Fantastic! Try playing with the hue_offset parameter and see how it affects the pattern. You will notice that smaller offsets create tighter colour gradients and large offsets create gradients that span big chunks of the spectrum.
Also try playing with the hue range-step (3rd parameter in line #15); you'll see that increasing the step size speeds up the spinning animation, and vice versa for smaller step sizes. This is because we're affecting how frequently we step through the entire colour spectrum - less frequent, larger steps result in big jumps between colours and hence, faster colour changes.
Now that we can control individual LEDs, you may be curious about controlling other parameters. For example, do we have to always set the saturation and value/brightness to 255? Of course not! Let's play with them and create even cooler effects.
Saturation
Saturation represents 'how much' of a colour is present. A fully saturated (i.e. saturation = 255) red colour is completely red, and lower values of saturation reduce the 'redness' of the red. At zero saturation, the red (or any colour for that matter) would just be white. So why would we ever want to reduce the saturation of our colours? As it turns out, lower saturations create a pleasing pastel/candy/unicorn colour effect which can change the vibe of the whole palette. Let's try it out! Change the saturation from 255 to 128 (half) in line 17 and check out the result.

Wow! I'm a sucker for candy colours - they're a sugary feast for the eyes. I haven't seen a light-ring so pleasing since the last time I was at a Tame Impala concert. Do play with the saturation setting and get an intuition for how it affects the mood of each colour. You can use it in your future LED projects to make the colours less tacky and more 'taffy'.
Brightness
The brightness setting is the most intuitive of the three. When set to 0, the LED is off, and when set to 255 it is fully bright. Despite how simple this setting is, you can actually use it to add cool concert animations such as 'flashes' and 'breathing' to your lights. So let's try both of those!
To flash the LEDs, we need to flip their brightness between 0 and 255 in a certain pattern. I think they look best when on for most of the time, then off for a bit, then on again. So we need to have two different lengths of time (or number of loop iterations) for when the lights are on vs when they're off. Let's draw a flowchart to visualize this brightness flashing logic.
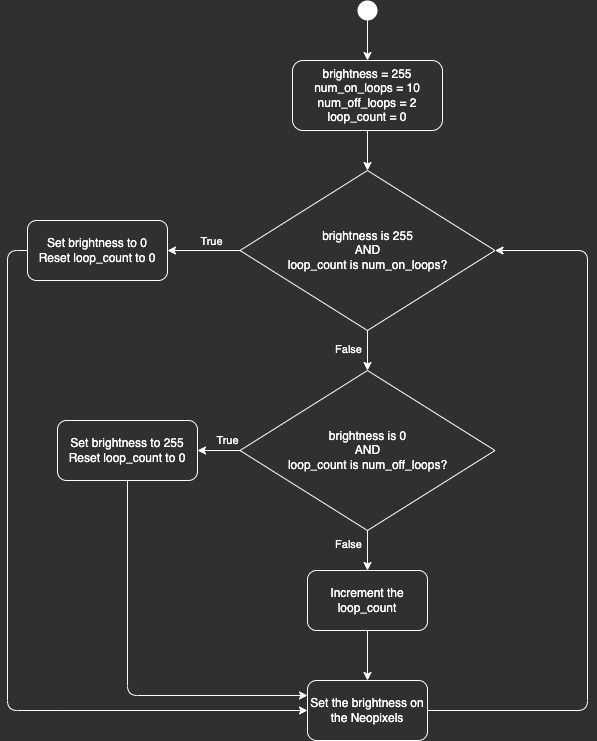
Initially we set the brightness to 255 to start the program with the LEDs on. We create two parameters to decide how long the lights will be on (10 iterations of the main loop) and how long they'll be off (2 loops). We create a variable, loop_count, to track how many loops have passed.
In the main loop, we check the loop_count to see if we've hit either of our limits. Either the lights are on and 10 loops have passed, in which case we switch the lights off. Or the lights are off and 2 loops have passed, in which case we switch them on again. If it's neither case, we simply increment the loop_count.
Let's try coding this! We want this brightness flashing to apply to all the LEDs so we'll put this logic before the LED for-loop. Let's modify our code from before as shown below.
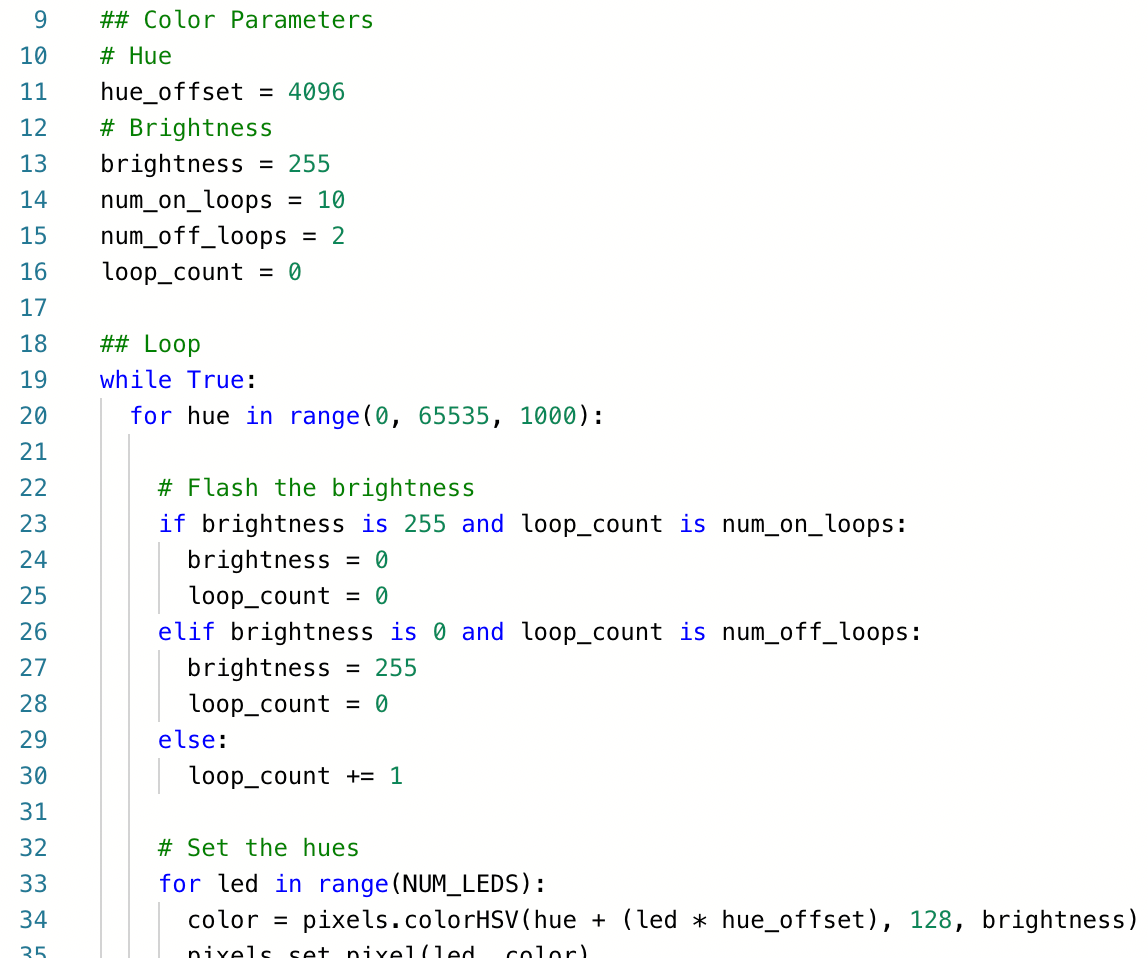
Make sure to change the '255' to our new brightness variable on line 34. Ooh I wonder what this'll look like! Let's click the 'play' button in the simulator pane and watch it in action.
Great success! Try playing with the two parameters, num_on_loops and num_off_loops, and see what numbers give you the effect you're most happy with. Maybe you can connect up a potentiometer to the Pico and use that to tweak the loop parameters in real-time, like a light-DJ! Sounds like a really fun project.
For our last trick tonight, we're gonna play with brightness again - but this time, we'll make the LEDs fade or 'breathe'. You may have seen this LED effect on certain smart-home devices. I like to think that Alexa/Siri is literally breathing out colourful photons, but hey that's just how I distract myself from the thought that they're probably spying on my every word and action.
Anyway, to make the LEDs breathe, we have to gradually increase and decrease the brightness instead of sharply changing it. We'll need a variable to track whether the brightness is currently going up or down, and three parameters to set our maximum brightness, minimum brightness, and breathing speed. As always, let's first visualize with a flowchart to make our lives easier.
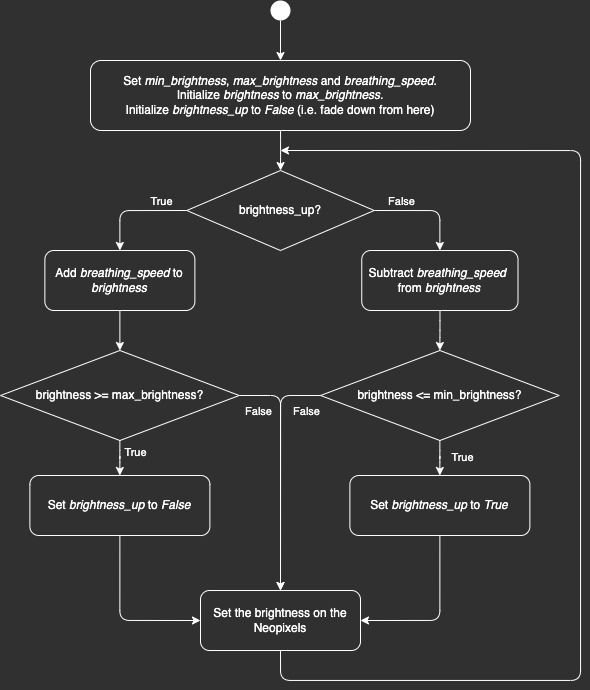
That flowchart is so symmetrical, it hurts. Let's just hope it actually works when translated into code. Modify our previous code to change it from a flashing animation to this breathing animation.
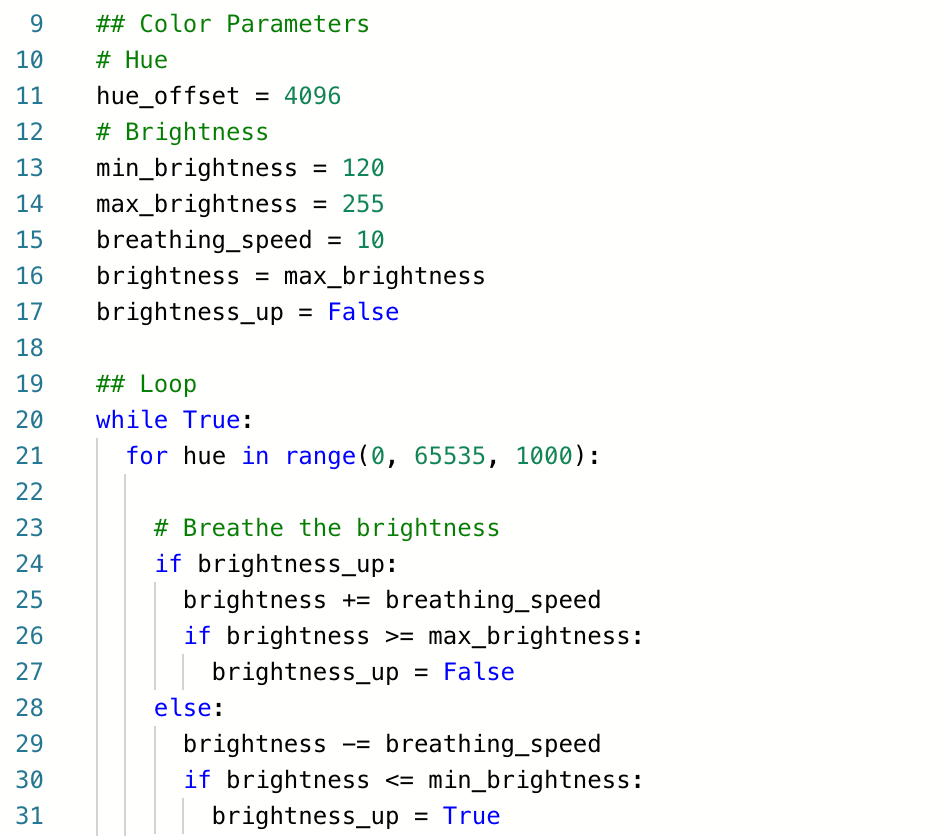
I played around with the three parameters a fair bit and personally liked the minimum brightness at about 120, max brightness at the maximum possible value 255, and breathing speed (i.e. how much the brightness changes per loop) at about 10. Do play around with them and see what you like - I imagine that different settings look better when sync'ed to different styles of music! Let's press 'play' in the simulator to see the result.
And that's it! You could combine all these effects in hue, saturation and value/brightness in dozens of different ways and create the animations of your dreams. You could even connect up to 3 potentiometers and use these to play with various aspects of the lighting effects in real-time while the code is running. You could use different colours to represent different temperatures, or make the lights turn on when someone enters the room. The possibilities are infinite!
I've embedded the final project below for you to play with ?
I hope you enjoyed playing with Micropython and Neopixels as much as I did, and I can't wait to see what you create with your new knowledge! Please share your projects and ideas with me on twitter! I am super excited for you and really glad that you're following this series and getting value out of it. If you ever need anything from me, Python-related or otherwise, please tweet/DM me on twitter and I'd be happy to chat. And if you want to know when the next secret of Micropython will be unveiled, just click Follow/Subscribe below. Till next time! Sayonara!
P.S. Heavy amounts of deep house and trance music were consumed during the making of this tutorial. If the light patterns herein sync perfectly with electronic dance beats, now you know why.